Milk kefir is one of the healthiest drinks you can take for your body.

This is because this natural drink is filled with good probiotics as well as lots of good bacteria strains that are extremely beneficial for the gut and hence your overall health and immune system.
This article will focus on just the steps to make your own milk kefir in Malaysia, but if you’d like to read more about the benefits of milk kefir, here’s a helpful link 😀
Alright, let’s begin making milk kefir!
Note that the timing and ingredients used here are very specific to Malaysian climate and temperature, so if you’re not from this region, they may vary. So feel free to experiment and adjust the timings to produce your own perfect milk kefir batch!
To start making your very own milk kefir, you’ll need 3 things.
Making Milk Kefir in Malaysia: Equipment

- Glass jar container
- A tablespoon of milk kefir grains. (30-40g)
- 300ml of fresh milk (the better the milk used, the more beneficial the milk kefir output. We use fresh raw cow milk in Malacca, but in KL, Farm Fresh or Farmhouse milk is good)
- Sieve (non-metal)
Making Milk Kefir in Malaysia: Steps
- Put your milk kefir grains into your glass container.
- Pour in your fresh milk.
- Cover jar loosely.
- Keep in a dry, cool and dark location for 24 hours.
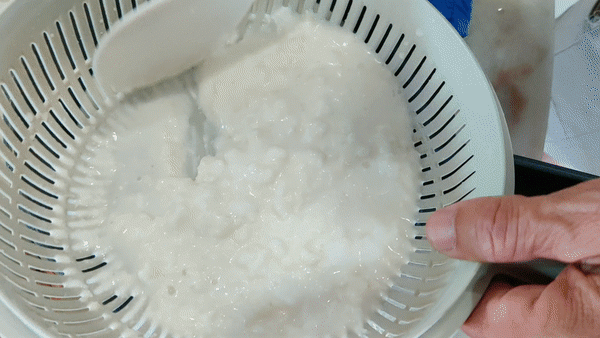
- After 24 hours, the kefir will start to separate. What this looks like is the kefir grains will be floating at the top and below it, you’ll see the pockets of whey which is the transparent liquid at the bottom of the floating kefir grains.
- Now to extract the kefir. First you stir the mixture so that it’s consistency becomes more uniformed and it’s easier to pour.
- Get ready a sieve and a new container you’d want to keep your milk kefir in. Pour the kefir mixture into the new container through the sieve.
- Take a spoon and move the kefir grains around. This is so that most of the kefir passes through and only the kefir grains are left in the sieve.
- Store the kefir in the fridge for later use.
- You can also drink immediately as is, or with fruits or make a smoothie with it. Below is a video with super easy delicious Milk Kefir Smoothie Recipes.
- For the kefir grains that you’ve already strained out, put them back into their original container, and add a second batch of fresh milk. Leave it in a dark, cool location for another 24 hours for your next batch!
If you’d like to watch a step-by-step video tutorial on how to make your own Milk Kefir in Malaysia, here you go!
To start improving your own gut health, make your own milk kefir! You can get our live active healthy milk kefir grains here 🙂

Or, if you’d like to try out how ours taste, you can get fresh milk kefir bottles delivered to you if you live in Malacca, KL or Selangor. Here’s a review of our products as well, from Get Fit KL.
Additional Tips for Brewing Milk Kefir in Malaysia
No Metal
Try not to use metal utensils when making milk kefir, because metal tends to react with the live kefir grains, making them weaker.
Give the grains time to adjust
If you purchase new milk kefir grains, give it a couple of tries.
The first few batches may not taste nice, or may not ferment right because the grains are already accustomed to their usual milk.
Don’t worry, it’s normal.
After a couple of batches, the kefir will start adjusting to your milk (even coconut or almond) and will start producing for you tasty and smooth kefir.
The Growing Grains Problem
Your grains will start growing as you feed them.
That’s a good thing! That means they are nice and healthy.
But if they grow, they will ferment the milk faster, which means that you’ll have to shorten your batch timing from 24 hours to 12 hours or less.
If you’re fine with the bigger amount of milk kefir you’ll be making, you can by all means continue that.
But if you’d like to slow down production, perhaps you can throw away the amount of kefir grains you don’t need, or you can simply eat them, that’s perfectly safe as well.
I need a break
If you would like to pause your milk kefir brewing, simply put your active grains into a glass container and put milk in just enough to submerge all the grains.
Leave it in the refrigerator to hibernate.
It would be good to take them out every two weeks to feed and make a batch, otherwise, they might get weak and die off.
Alright, that is all. If we missed anything, feel free to point them out in the comments below. Plus, if you have any other tips on making milk kefir in Malaysia, please share them in the comments below so that we can all benefit from shared knowledge.
If you’d like to get regular updates when we post up new articles and videos, you can subscribe here to get notifications.
See you in our next article! Till then, happy brewing!
Can i buy kefir grains from ur company?
Yes of course 🙂 If you’re living within KL/Selangor, we’ll deliver to you by driver. If you’re living in any other state in Pen Malaysia, then we’ll post the grains to you 🙂 will reach in a day or two usually.
Don’t you have to boil the milk first?
Do you conduct classes? I would love to attend. Thank you very much.
No, boiling the milk is not necessary. Best for the milk to be as fresh as possible. It’s also important to note, that the kefir grains are alive, and high temperatures will kill them. So no boiling the milk 😛
How do I purchase… Any link?
Hi Jini, yes of course 🙂 you can buy all things kefir from our shop: https://thekefirking.com/product-category/kefir/
How to buy kefir grains from you?
Hey Shevonne, you can easily get them from our shop. 🙂 Here’s the link! https://thekefirking.com/product/milk-kefir-grains/